Embarking on a backpacking adventure shouldn’t mean sacrificing stunning photography. This guide delves into the art of traveling light while still capturing breathtaking images. We’ll explore essential gear selection, weight reduction techniques, and smart packing strategies, empowering you to document your journey without the burden of excessive equipment.
From choosing the right camera and lenses to mastering efficient battery management and employing clever travel hacks, we’ll equip you with the knowledge and skills to photograph your backpacking experiences without compromise. We’ll also address crucial aspects like travel insurance and safety considerations, ensuring your gear and yourself are protected throughout your adventure.
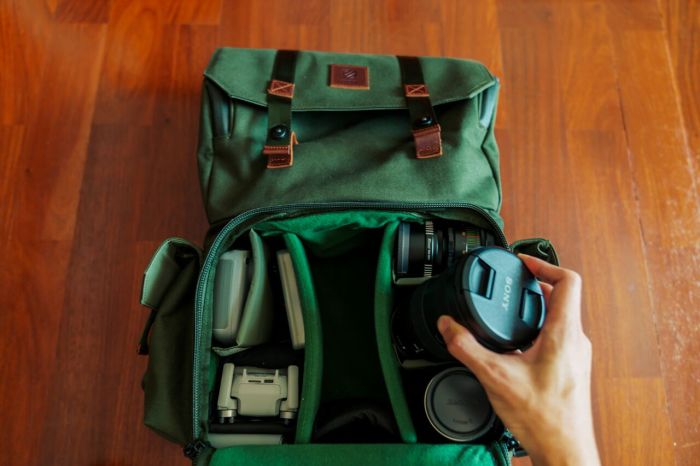
Essential Photography Gear for Backpackers
Traveling light with photography gear requires careful consideration of what’s truly essential. Prioritizing versatility and minimizing weight are key to enjoying your backpacking trip without the burden of excessive equipment. This section Artikels the five most crucial pieces of equipment, along with strategies for packing and choosing appropriate carrying solutions.
Essential Gear List
Choosing the right gear is paramount for successful backpacking photography. The following table lists five essential items, considering weight, purpose, and potential alternatives. Remember that weights are approximate and can vary based on manufacturer and model.
| Item | Weight (approx.) | Purpose | Alternative |
|---|---|---|---|
| Mirrorless Camera (e.g., Sony a6000, Fujifilm X-T30) | ~400g | High-quality image capture, compact size, versatile lens options. | Smartphone with a high-quality camera (for casual shots). |
| Versatile Zoom Lens (e.g., 18-135mm or similar) | ~400g | Covers a wide range of focal lengths, minimizing the need for multiple lenses. | Prime lens (e.g., 35mm) for specific situations (lighter but less versatile). |
| Small Tripod (e.g., lightweight carbon fiber) | ~500g | Provides stability for sharp images, especially in low light or when using longer exposures. | Beanbag, rock, or other stable surface (less convenient, less stable). |
| Extra Battery | ~100g | Ensures you can continue shooting throughout your trip, especially in cold weather. | Power bank (adds weight and requires additional charging). |
| SD Cards (at least two) | ~20g | Sufficient storage for capturing photos and videos. | Cloud storage (requires connectivity, which may not always be available). |
Packing Strategy
Efficient packing is crucial for maximizing space and protecting your valuable gear. Consider using a combination of methods to keep everything organized and secure. First, wrap each item individually in a soft, protective material like microfiber cloths. This prevents scratching and adds an extra layer of cushioning. Then, organize these wrapped items within a dedicated camera compartment within your backpack or a smaller, padded camera cube.
Place heavier items at the bottom, distributing weight evenly. Ensure that your camera and lenses are easily accessible without having to unpack your entire backpack. Consider placing your extra battery and memory cards in a waterproof zip-lock bag inside a pocket to protect them from the elements.
Lightweight Camera Bag Options
Several lightweight camera bag options are well-suited for backpacking. Look for bags made from durable, lightweight materials such as ripstop nylon or similar fabrics. Choose a bag with a padded interior to protect your gear from bumps and impacts. A good option would be a small, waist-pack style camera bag, allowing easy access while keeping the weight close to your body.
Alternatively, a lightweight backpack insert, designed to fit inside a larger backpack, can offer excellent protection and organization without adding significant bulk. The key is to find a bag that is comfortable, secure, and perfectly sized for your essential gear – avoid overpacking!
Choosing the Right Camera and Lenses
Selecting the optimal camera and lenses is crucial for backpacking photography. The right equipment balances image quality with portability, ensuring you capture stunning shots without carrying excessive weight. The choice between mirrorless and DSLR cameras, and the selection of appropriate lenses, significantly impacts your photographic journey.Mirrorless cameras and DSLRs each present advantages and disadvantages for the backpacking photographer.
The decision hinges on individual priorities regarding image quality, size, and weight.
Mirrorless vs. DSLR Cameras for Backpacking
Mirrorless cameras generally offer a smaller and lighter body than DSLRs, making them a popular choice for backpackers prioritizing portability. Their electronic viewfinders (EVFs) also provide real-time image preview with exposure settings, aiding in composition. However, DSLRs often boast superior battery life and a more robust build, potentially better withstanding the rigors of backpacking. Furthermore, DSLR lenses generally offer a wider selection and may be more affordable in certain ranges.
Ultimately, the best choice depends on individual needs and preferences. For instance, a photographer prioritizing lightweight gear and real-time exposure adjustments might choose a mirrorless camera, while someone needing extended battery life and a more durable body might opt for a DSLR.
Lens Selection for Diverse Backpacking Scenarios
Choosing the right lenses is vital for capturing diverse subjects encountered while backpacking. A versatile lens selection allows you to adapt to various photographic situations without carrying excessive weight.
- Landscape Photography: Wide-angle lenses (e.g., 16-35mm) are essential for capturing expansive landscapes, showcasing the grandeur of mountains, forests, and other natural settings. These lenses allow for dramatic perspectives and a sense of scale. A wider angle will let you capture more of the scene. A prime lens (a lens with a fixed focal length) will generally be lighter than a zoom lens with a similar field of view.
- Portrait Photography: A telephoto lens (e.g., 85mm or 105mm) is ideal for capturing compelling portraits of fellow travelers or locals encountered along the trail. These lenses compress perspective, creating pleasing background blur (bokeh) and emphasizing the subject.
- Wildlife Photography: A telephoto zoom lens (e.g., 100-400mm) is crucial for capturing wildlife from a distance, minimizing disturbance and maximizing detail. The longer reach allows you to photograph animals without getting too close, ensuring both safety and stunning images.
Lightweight and Versatile Zoom Lenses for Backpacking
Lightweight and versatile zoom lenses are a practical choice for backpackers aiming to minimize weight without sacrificing photographic versatility. These lenses offer a range of focal lengths, enabling you to capture various subjects with a single lens.
- Examples: The Tamron 17-70mm f/2.8 Di III-A VC RXD for Sony mirrorless cameras is a compact and versatile lens, covering wide-angle to telephoto ranges. Similarly, the Sigma 17-50mm f/2.8 EX DC OS HSM for Canon DSLRs provides excellent image quality and a useful zoom range. These are just two examples; many other lightweight zoom lenses are available from various manufacturers.
The specific best choice will depend on your camera system.
Minimizing Weight and Maximizing Efficiency
Traveling light with photography gear requires a strategic approach to weight reduction without compromising image quality. This involves careful gear selection, efficient packing techniques, and mindful maintenance practices. The goal is to maximize the photographic opportunities while minimizing the burden on your back.
Three key techniques significantly reduce the overall weight of your photography kit: choosing lightweight gear, utilizing versatile equipment, and employing minimalist packing strategies. These techniques, when implemented effectively, allow you to carry less without sacrificing image quality or functionality.
Lightweight Gear Selection
Opting for lightweight alternatives for your camera body and lenses makes a considerable difference. Carbon fiber tripods, for example, are significantly lighter than their aluminum counterparts, while maintaining stability. Similarly, choosing a mirrorless camera system often results in a considerable weight reduction compared to a DSLR. Consider the weight of each piece of equipment and research lightweight alternatives that still meet your photographic needs.
For instance, a lightweight prime lens might replace a heavier zoom lens, depending on your photographic style and the types of shots you intend to capture. Prioritizing quality over bulk is crucial in this process.
Efficient Cleaning and Maintenance
Maintaining clean camera equipment is essential for preserving image quality, but carrying bulky cleaning kits is unnecessary. A microfiber cleaning cloth is sufficient for most dust and smudges. A small, air blower (like those used for electronics) can remove dust particles from the lens and sensor. For more stubborn debris, a sensor cleaning kit can be a valuable but compact addition.
Remember to always clean your gear gently to avoid scratching the lens or sensor. Regular cleaning, even in the field, will minimize the need for extensive cleaning later, thus reducing the need for larger, heavier cleaning supplies. Keep your gear in a sealed, dry bag to prevent dust and moisture damage.
Battery Life and Storage Management
Managing battery life and storage is crucial for long backpacking trips. Spare batteries are essential, but carrying many can quickly add weight. Consider purchasing high-capacity batteries to extend shooting time. Always store batteries in a cool, dry place to maximize their lifespan. Avoid storing them fully charged or completely discharged for extended periods.
To optimize battery life, switch your camera to power-saving mode when not actively shooting. Use external battery packs to charge your camera batteries on the go, reducing the need to carry numerous spare batteries. Keeping a record of your battery usage patterns can also help predict how many batteries you’ll need for future trips. For example, if you shoot 200 images per day and a single battery lasts 500 images, you know that you’ll need two batteries per day.
This planning allows you to pack only the necessary batteries.
Travel Hacks for Photographers
Streamlining your photography workflow while backpacking requires clever planning and efficient techniques. These hacks focus on maximizing image quality while minimizing the burden of carrying heavy equipment. By implementing these strategies, you can capture stunning photos without sacrificing your comfort or mobility on the trail.
Efficient photography on backpacking trips demands a strategic approach to gear management and workflow. These travel hacks are designed to help you capture breathtaking images without compromising your backpacking experience. They focus on speed, efficiency, and minimizing the impact of your gear on your journey.
Utilizing Pre-set Camera Settings
Pre-setting your camera for common backpacking scenarios—like sunrise/sunset shots or landscape photography—can significantly speed up your workflow. Instead of fiddling with settings in the field, you can quickly switch to a pre-programmed mode, allowing you to capture the moment without delay. For example, create a custom setting for landscapes with a wide aperture and low ISO for maximum depth of field and minimal noise.
Another could be a fast shutter speed and high ISO for wildlife shots in low light. This reduces time spent adjusting settings and increases the likelihood of capturing fleeting opportunities.
Employing External Hard Drives and Cloud Storage
Regularly backing up your photos is crucial. Carrying an external hard drive allows for immediate offloading of images from your camera’s memory cards, preventing potential data loss. Coupled with cloud storage services like Google Photos or Dropbox, you create a redundant system that ensures your precious images are safe, even if one storage method fails. This two-pronged approach offers peace of mind knowing your work is secure, even in remote locations with limited internet access.
Mastering the Art of Image Editing on Mobile Devices
While extensive post-processing is best done on a computer, basic edits on a mobile device can save significant time and effort. Mobile apps like Snapseed or Lightroom Mobile offer powerful editing tools, allowing you to quickly adjust exposure, contrast, and sharpness. This allows you to share your photos immediately or cull your images, removing unnecessary files before transferring them to a larger storage device.
This minimizes the amount of data you need to manage.
Packing Light: The Power of Adaptability
Choosing versatile lenses and gear is paramount. A zoom lens, for instance, can replace multiple prime lenses, significantly reducing weight. Consider the types of shots you’ll likely take and choose gear accordingly. For example, if you’re primarily capturing landscapes, a wide-angle zoom lens might suffice. If wildlife photography is your focus, a telephoto zoom lens becomes essential.
This approach allows for adaptability without carrying unnecessary weight.
Utilizing Natural Light and Avoiding Artificial Lighting
Relying on natural light eliminates the need to carry bulky and power-hungry artificial lighting equipment. This significantly reduces weight and complexity. Learning to shoot during the golden hour (sunrise and sunset) and utilizing available light sources, such as reflections or backlighting, allows you to capture stunning images without additional equipment. This also contributes to a more sustainable and minimalist backpacking experience.
Drone Usage for Backpacking Photography: Weighing the Pros and Cons
Drones offer unique perspectives, but their use for backpacking photography involves careful consideration.
The advantages of using a drone for backpacking photography include the ability to capture stunning aerial shots and unique perspectives not possible from the ground. This can greatly enhance the visual storytelling of your journey. However, the drawbacks are significant. Drones add considerable weight to your pack, impacting your overall carrying capacity. Battery life is also a limiting factor, requiring careful planning and extra batteries (adding even more weight).
Furthermore, regulations concerning drone usage vary widely across locations, and it’s crucial to be aware of and comply with local laws to avoid fines or legal issues. For example, some national parks have strict restrictions or outright bans on drone use.
Photography Gear Security Checklist
Protecting your photography gear during travel is crucial. This checklist ensures your equipment remains safe and functional throughout your journey.
- Camera body and lenses securely stored in a padded camera bag.
- Memory cards stored in a protective case, ideally with duplicates.
- Batteries charged and stored in a separate case to prevent short-circuiting.
- Cleaning supplies (lens cloth, blower) readily accessible.
- External hard drive and/or cloud storage configured for regular backups.
- Camera bag secured to your backpack or person to prevent theft.
- All gear insured against loss or damage.
Travel Insurance and Safety Considerations
Protecting your photography gear and yourself while backpacking is paramount. Investing in comprehensive travel insurance and implementing a robust safety plan are crucial for a worry-free adventure. This section details how to safeguard your equipment and yourself against unforeseen circumstances.Travel insurance is more than just medical coverage; it’s a safety net for your valuable photography equipment. Without it, replacing lost or damaged gear could be financially devastating.
Choosing the right policy involves carefully considering the specifics of your trip and the value of your equipment.
Selecting Comprehensive Travel Insurance
Choosing appropriate travel insurance requires a thorough assessment of your trip’s specifics and the value of your gear. Look for policies that explicitly cover loss, theft, and damage to photographic equipment. Don’t rely on generic policies; ensure the policy clearly states coverage amounts and any exclusions related to photography gear. Obtain quotes from multiple insurers, comparing coverage levels and premiums.
Consider adding additional coverage for expensive items, possibly even declaring the individual value of your camera and lenses separately. Keep a detailed inventory of your gear with serial numbers and purchase receipts – this is essential for claims processing. Remember, the peace of mind provided by adequate insurance is invaluable.
Protecting Photography Gear in Unpredictable Weather
Protecting your gear from the elements is vital. A waterproof backpack is the first line of defense against rain or unexpected downpours. Consider using waterproof camera bags or cases for added protection. For extreme weather, investing in a dry bag designed for submersion can safeguard your equipment even during heavy rainfall or accidental immersion in water. When faced with extreme conditions like snow or heavy rain, prioritize finding sheltered locations to avoid damage.
Regularly check your equipment for signs of moisture or damage. Quick-drying microfiber cloths can be invaluable for wiping away moisture.
Safe Storage and Transportation of Photography Equipment
Safe transportation of your gear requires careful planning and execution. On airplanes, keep your camera and lenses in your carry-on luggage to prevent loss or damage during checked baggage handling. Utilize padded camera inserts or cases to protect your equipment from bumps and jolts. On buses or trains, keep your equipment close and within sight to deter theft.
Avoid leaving your gear unattended in public spaces. When staying in hostels or budget accommodations, consider using a lockable safe or securing your equipment within your luggage using cable locks. Remember, prevention is always better than cure.
Travel Photography Tips and Techniques

Backpacking and photography are a fantastic combination, offering unique opportunities to capture breathtaking images. However, successfully combining these passions requires careful planning and execution. This section explores several creative techniques, strategies for landscape photography, and ethical considerations for wildlife photography, all tailored to the backpacking experience.
Creative Photography Techniques for Backpackers
Employing creative techniques enhances the visual storytelling aspect of your backpacking photography. These techniques help elevate your images beyond simple snapshots, capturing the essence of your journey. The following examples utilize natural light and focus on compelling composition.
- Silhouetting: Position your subject (a tree, a mountain peak, even yourself) against a bright background, like a setting sun. This creates a dramatic effect, emphasizing the subject’s shape and form while the details are lost in shadow. Imagine a lone hiker silhouetted against a fiery sunset over a vast mountain range. The viewer’s eye is immediately drawn to the hiker’s shape and the grandeur of the landscape, creating a powerful visual narrative.
- Leading Lines: Use natural elements like a winding river, a trail, or a fence to draw the viewer’s eye into the photograph. These lines guide the gaze towards the main subject, creating depth and visual interest. For example, a winding mountain path leading towards a distant peak, with the path itself becoming a compelling visual element. The path becomes the narrative, leading the viewer’s eye towards the ultimate destination within the frame.
- Rule of Thirds: Instead of centering your subject, place it at one of the four intersection points created by dividing your frame into thirds both horizontally and vertically. This often creates a more balanced and visually appealing composition. Imagine a majestic waterfall positioned along one of these intersection points, allowing the surrounding landscape to fill the frame in a harmonious manner. The waterfall remains the focal point but is not overwhelmed by its environment, resulting in a balanced and pleasing image.
Capturing Stunning Landscape Photographs While Backpacking
Landscape photography while backpacking requires anticipation and adaptability. Timing, weather, and location play crucial roles in capturing stunning images.Timing is key. The “golden hour” (the hour after sunrise and the hour before sunset) offers soft, warm light that is ideal for landscape photography. Similarly, the “blue hour” (the period of twilight before sunrise and after sunset) provides a unique, cool-toned ambiance.
Weather conditions also impact the final result. Cloudy days offer diffused light, reducing harsh shadows and providing even illumination. A slight mist or fog can add an ethereal quality to your photographs. Choosing the right location involves scouting beforehand (using maps and online resources) and being open to spontaneous discoveries along the trail. Consider unique perspectives; a high vantage point can offer panoramic views, while a low angle can emphasize foreground elements.
Ethically and Responsibly Photographing Wildlife While Backpacking
Wildlife photography presents a unique ethical challenge. Maintaining a safe distance is paramount, both for your safety and the animal’s well-being. Never approach or attempt to interact with wildlife. Use a telephoto lens to capture images from a distance. Avoid using flash, as it can startle animals and disrupt their behavior.
Respect their natural habitat and leave no trace. Observe and document, but do not interfere with their natural routines. Remember that the animals’ welfare is paramount, and your photographs should never compromise that.
Travel Tips for Backpackers
Backpacking offers unparalleled freedom and adventure, but careful planning significantly enhances the experience. This section provides essential travel tips unrelated to photography, focusing on safety, efficiency, and overall enjoyment of your backpacking journey. These tips are designed to help you navigate various situations and maximize your time exploring.
Beyond the thrill of capturing stunning landscapes, a well-planned backpacking trip hinges on practical considerations. Effective preparation can transform potential challenges into opportunities for growth and unforgettable memories.
Essential Travel Tips for a Smooth Backpacking Experience
Prioritizing these five tips will significantly improve your backpacking experience, ensuring a smoother and more enjoyable journey. They address common challenges and offer practical solutions to optimize your time and resources.
- Pack light but smart: The weight of your backpack directly impacts your comfort and stamina. Carefully select clothing items that are versatile and quick-drying, opting for lightweight and durable materials. Avoid overpacking; pack only the essentials and consider the climate of your destinations.
- Learn basic first aid: Knowing basic first aid can be invaluable in remote locations where medical assistance might be limited or delayed. A comprehensive first-aid kit, along with knowledge of how to use it, is crucial for addressing minor injuries and illnesses. Consider taking a basic first-aid course before your trip.
- Stay hydrated: Dehydration can significantly impact your energy levels and overall well-being, especially during strenuous activities. Carry a reusable water bottle and refill it whenever possible. Consider using water purification tablets or a filter if you’re unsure about the safety of local water sources.
- Respect local customs and cultures: Before your trip, research the customs and traditions of the places you’ll be visiting. Showing respect for local cultures demonstrates consideration and helps foster positive interactions with locals. This includes appropriate clothing, communication styles, and awareness of local etiquette.
- Inform someone of your itinerary: Share your detailed travel plans, including your itinerary, accommodation details, and emergency contact information, with a trusted friend or family member. This ensures someone knows your whereabouts and can alert authorities if necessary.
Budget-Friendly and Safe Accommodation for Photographers
Finding safe and affordable accommodation is a crucial aspect of backpacking. This section Artikels strategies for securing suitable lodging that caters to both budget constraints and the specific needs of photographers.
Hostels often offer a cost-effective solution, providing a social atmosphere and opportunities to meet fellow travelers. However, always prioritize safety and security by researching reviews and choosing reputable establishments with secure storage for equipment. Alternatively, consider guesthouses or Airbnb options, ensuring they offer secure storage for your valuable camera gear. Look for places with good reviews regarding security and proximity to your planned activities.
Staying Connected in Remote Areas
Maintaining communication while backpacking in remote areas can be challenging but essential for safety and peace of mind. This section explores strategies for staying connected, even in areas with limited or no cellular service.
Satellite phones offer a reliable communication option in areas without cellular coverage. While more expensive than cell phones, they provide a lifeline in emergencies. Alternatively, consider purchasing a local SIM card upon arrival to access local mobile networks, although coverage may be limited in remote regions. Before your trip, research the availability of mobile networks in the areas you plan to visit.
In some areas, relying on designated communication points or arranging check-in times with a contact person may be necessary. Always inform someone of your plans and expected communication schedule.
Travel Visa Requirements
Securing the correct travel visas is a crucial, often overlooked, aspect of backpacking, especially when carrying photography equipment. Failure to obtain the necessary documentation can lead to significant delays, hefty fines, or even deportation, severely impacting your trip and potentially damaging your valuable gear. Careful planning and proactive research are essential to avoid these pitfalls.Visa requirements vary dramatically depending on your citizenship and your destination country.
The process for obtaining a visa can range from a simple online application to a complex procedure involving extensive paperwork, interviews, and potentially lengthy processing times. Furthermore, the specific visa requirements might influence how you transport your photography equipment, as some countries have stricter regulations on importing certain types of gear.
Visa Application Processes
The process of applying for a travel visa typically involves several steps. First, you need to determine the specific visa type required based on the purpose and duration of your stay. This information is usually available on the website of the embassy or consulate of the country you plan to visit. Next, you’ll need to gather the necessary documentation, which often includes a completed application form, passport photos, proof of travel arrangements, and financial statements demonstrating sufficient funds for your trip.
You may also need to provide proof of accommodation, a letter of invitation, or other supporting documents depending on the country’s requirements. Finally, you will submit your application, either online or in person, and pay the relevant fees. Processing times can vary significantly, ranging from a few days to several weeks or even months, so applying well in advance is strongly recommended.
Impact of Visa Requirements on Photography Equipment
The type of visa you obtain can indirectly influence how you transport your photography equipment. For example, a tourist visa might allow you to bring in your gear for personal use, but a working visa might require you to declare your equipment more formally and potentially pay import duties. Some countries may have specific restrictions on bringing in professional-grade equipment, especially if you intend to use it for commercial purposes.
It’s always advisable to check the customs regulations of your destination country to ensure a smooth and hassle-free entry with your photography equipment. Failure to declare equipment correctly could result in confiscation or substantial fines.
Examples of Visa Processes
Many countries in Southeast Asia, such as Thailand and Vietnam, offer relatively straightforward visa processes for backpackers, often allowing for visas on arrival or easily obtained e-visas. These processes typically involve minimal paperwork and relatively short processing times. Conversely, countries like Russia or some nations in South America might have more stringent requirements, demanding more extensive documentation and potentially longer processing times.
For instance, obtaining a Russian visa often involves an invitation letter from a host in Russia and a detailed itinerary. It is essential to research the specific requirements of each country well in advance of your travel dates. Always check the official government websites for the most up-to-date and accurate information.
Urban Escapes and Vacation Packages
Integrating urban photography into a backpacking itinerary presents a unique set of advantages and disadvantages for the adventurous photographer. The fast-paced, ever-changing nature of cityscapes offers a dynamic contrast to the often slower rhythms of natural landscapes, providing a diverse range of photographic opportunities. However, navigating crowded streets, unpredictable weather, and logistical challenges specific to urban environments can also present significant hurdles.The choice between independent backpacking and organized vacation packages significantly impacts a photographer’s experience.
Both approaches offer distinct benefits and drawbacks depending on individual preferences and priorities. Independent backpacking provides unparalleled flexibility and control, allowing photographers to tailor their itinerary to specific photographic interests and explore hidden gems often missed on pre-planned tours. Conversely, organized packages offer the convenience of pre-arranged accommodations, transportation, and potentially guided tours, which can be particularly valuable in unfamiliar urban environments.
However, this convenience often comes at the cost of flexibility and spontaneity.
Advantages and Disadvantages of Incorporating Urban Photography into a Backpacking Itinerary
Urban photography offers a wealth of opportunities for capturing unique architectural details, street scenes teeming with life, and the vibrant energy of city life. The diversity of subjects, from grand monuments to everyday moments, provides endless creative possibilities. However, navigating bustling city streets with heavy photography gear can be cumbersome. Permission and access restrictions for certain locations may also limit photographic opportunities.
Additionally, the unpredictable nature of urban environments, including weather and crowds, can pose challenges to capturing the desired shots. The constant need to be aware of surroundings and personal safety adds another layer of complexity.
Comparing Independent Backpacking and Organized Vacation Packages for Photographers
Independent backpacking offers the ultimate freedom to explore at your own pace, focusing on locations and subjects that resonate with your photographic vision. You can dedicate more time to specific areas, experiment with different shooting styles, and adapt your itinerary based on discoveries along the way. However, it demands meticulous planning, research, and self-reliance. Finding accommodation, managing transportation, and ensuring safety are all responsibilities that fall solely on the individual.
Organized vacation packages, on the other hand, streamline the logistical aspects of travel, often including guided tours that offer insider access to key locations and provide opportunities for interaction with local communities. However, the pre-determined itinerary may restrict your photographic exploration and limit spontaneity. The pace of the tour may not always align with your photographic needs.
Destinations Blending Urban and Natural Landscapes
Several destinations worldwide offer an ideal blend of urban exploration and natural beauty, perfectly suited for backpacking photographers. For example, Kyoto, Japan seamlessly merges ancient temples and traditional gardens with modern city life, offering a rich tapestry of photographic subjects. Banff National Park, Canada, combines stunning mountain scenery with the charming town of Banff, providing opportunities for both landscape and urban photography.
Similarly, Santorini, Greece, offers breathtaking caldera views alongside picturesque white-washed villages, providing a stunning backdrop for capturing both natural and urban elements. Guilin, China, showcases dramatic karst mountains alongside a vibrant city with unique cultural aspects. These locations allow for a diverse photographic journey, combining the tranquility of nature with the dynamic energy of urban environments.
Vacation Programs and Venture Capital (Tangential Exploration)
Monetizing photography skills within the travel industry presents exciting opportunities for both individual photographers and innovative businesses. The intersection of travel, photography, and entrepreneurship offers a unique pathway to generating income and potentially attracting venture capital investment. This section explores how photographers can leverage their skills and the potential for investment in this burgeoning field.Photography skills can be lucratively monetized through various vacation programs and online platforms.
Many tour operators and travel agencies actively seek photographers to document their trips, creating visually compelling content for marketing purposes. Freelance photographers can also offer their services directly to individual travelers, providing high-quality photos and videos of their adventures. Furthermore, the rise of online platforms like Instagram, Flickr, and 500px has opened up new avenues for photographers to showcase their work, build a following, and sell prints or licenses to their images.
Monetizing Photography Skills Through Vacation Programs
Photographers can actively seek partnerships with tour operators and travel agencies. Offering packages that include professional photography services alongside the standard vacation itinerary can significantly increase the value proposition for clients. Examples include creating personalized photo albums or videos for travelers, providing high-resolution images for social media marketing, or even offering post-trip photo editing services. Successful monetization strategies require a strong portfolio, effective marketing, and a clear understanding of the target audience’s needs.
Building a professional website and actively networking within the travel industry are crucial for securing these opportunities.
Venture Capital Investment in Travel Photography Technologies
The travel photography industry is ripe for technological innovation. Startups developing AI-powered photo editing software, drone photography services optimized for travel, or virtual reality experiences centered around travel photography could attract significant venture capital investment. Companies offering innovative solutions that streamline the workflow for travel photographers, improve image quality, or enhance the user experience are likely to be attractive to investors.
For example, a company specializing in lightweight, high-quality camera drones designed for backpacking could appeal to both venture capitalists and travel photographers. The success of such ventures hinges on demonstrating a strong market need, a scalable business model, and a clear path to profitability.
Challenges and Opportunities in Travel Photography Entrepreneurship
The intersection of travel, photography, and entrepreneurship presents both challenges and opportunities. Challenges include fierce competition, the need for continuous adaptation to evolving technologies and market trends, and the inherent risks associated with starting a business. However, the opportunities are significant. The growing demand for high-quality travel photography, the increasing popularity of online platforms for showcasing and selling photographic work, and the potential for innovation within the industry create a fertile ground for entrepreneurs.
Successful ventures will require a combination of creative talent, business acumen, and a strong understanding of the travel photography market.
Mastering the art of lightweight photography for backpacking trips unlocks a world of possibilities. By strategically selecting your gear, implementing efficient packing methods, and prioritizing safety, you can capture stunning visuals without sacrificing comfort or mobility. Remember, the journey is as important as the destination – and with the right preparation, your photographic journey will be both rewarding and unforgettable.
Questions and Answers
What’s the best way to protect my camera from rain?
Invest in a waterproof camera bag or use a rain cover specifically designed for camera equipment. Consider using waterproof bags or cases for additional protection of individual items.
How do I charge my camera batteries while backpacking?
Carry portable power banks with sufficient capacity to recharge your batteries. Solar chargers are also a viable option for longer trips.
What if my camera gets damaged during my trip?
Comprehensive travel insurance is crucial. Ensure your policy covers loss, theft, and damage to photographic equipment. Keep detailed records of your gear and its value.
Are there any restrictions on bringing camera equipment on airplanes?
Check with your airline regarding specific regulations on carrying batteries and electronic devices. Lithium-ion batteries often have restrictions on capacity and how they are carried.